At the end of my last session I had the all the hardware done, the encoders working and had converted the version 3 WallBot code to the new platform. All looked good except for the fact that I could not get the motors to turn.
The problem, in a nutshell, is that the motors need a PWM signal on pins 9 and 10 but that does not seem possible to achieve while using the Servo library.
I experimented to see if I could emulate a PWM signal via the existing Timer2 interrupt routine that is being used to sample the encoders. The interrupt is running at 16KHz so I should be able to create a 250Hz PWM signal with a resolution of 64 steps.
After a few issues I was able to create the needed PWM signal, and verify it with an oscilloscope.

Motors are now working.
I thought, “Great, problem solved” but while the motor and encoders were now functioning, the servo was very jittery and the sonic sensor was returning nonsense data.
After some experimentation I discovered that having an interrupt frequency above 1KHz severely impacts the ability for the servo and sensor code to function correctly. Seems that I’m hitting the limits of what the Arduino’s ATMega328 processor can handle…. and I’ve only just got started on this project. Very disheartening indeed.
Still, I’ve come this far. I don’t want to give up just yet.
Enter The Trinket
Just happen to have an ATtiny85 microcontroller board from Adafruit called a “Trinket”.

Figured I could use this to drive the servo and sonic sensor and and have the Arduino communicate with it via I2C.
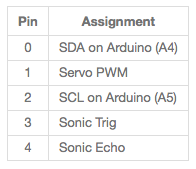
The board has the following pins:

Can use pins 0 and 2 for the I2C bus, pin 1 for driving the servo and pins 3 and 4 to handle the sensor.
Perfect.
Added headers, foam taped it to the perfboard and wired it up…

Talking To the Trinket
I’ve only ever used I2C indirectly via other libraries and have never done anything with it myself, so this is something new to me. I’ll skip over what I learnt and just document what I ended up implementing. In a later post I’ll follow up in more detail on how it all works.
First I needed to have the Trinket as a I2C slave. There is a very nice TinyWire lib available to do just that.
I settled on implementing a very simple “register” based protocol where the slave has virtual registers the master can read and write to.
In my case I want to be able to control the servo and read the distance value from the sensor so I created the following registers on the Trinket:

The first four registers are read-only and are updated with current sensor and servo states.
The remaining registers are for configuring and controlling the servo. Most are 8 bit and a few are 16 bit.
On the master side – the Arduino that is – I created a function to read any of the Trinket’s 8 bit registers:
bool trktRegRead( char reg, char *value )
{
  char count = 5;
  while(  count-- > 0 )
  {
    Wire.beginTransmission(TRINKET_ADDRESS);
    Wire.write(reg);
    if( Wire.endTransmission() == 0)
    {
      if( Wire.requestFrom(TRINKET_ADDRESS, 1) == 1 )
      {
        *value = Wire.read();
        return true;
      }
    }
  }
    return false;
}
And one for the 16 bit registers:
bool trktRegRead2( char reg, int *value )
{
  char count = 5;
  while(  count-- > 0 )
  {
    Wire.beginTransmission(TRINKET_ADDRESS);
    Wire.write(reg);
    if( Wire.endTransmission() == 0)
    {
      if( Wire.requestFrom(TRINKET_ADDRESS, 2) == 2 )
      {
        uint16_t hi = (uint16_t)((uint8_t)Wire.read());
        uint16_t lo = (Wire.read()&0xff);
        *value = (int)((hi<<8)|lo);
        return true;
      }
    }
  }
    return false;
}
On startup the Arduino waits for the Trinket to be ready by polling the status register:
void waitForTrinket()
{
  char status = 0;

  Serial.print("Waiting for Trinket..");

  while(true)
  {
    if( trktRegRead(TRKT_STATUS, &status)
        && status == TRKT_STATUS_READY)
    {
      break;
    }
    Serial.print(".");
    delay(100);
  }

  Serial.println("Ready.");

}
We can to write to the 8 bit and 16 bit servo registers too:
bool trktRegWrite( char reg, char value )
{
  char count = 5;
  while(  count-- > 0 )
  {
    Wire.beginTransmission(TRINKET_ADDRESS);
    Wire.write(reg);
    Wire.write(value);
    if( Wire.endTransmission() == 0)
    {
      return true;
    }
  }
  return false;
}

bool trktRegWrite2( char reg, int value )
{
  char count = 5;
  while(  count-- > 0 )
  {
    Wire.beginTransmission(TRINKET_ADDRESS);
    Wire.write(reg);
    Wire.write(value>>8);
    Wire.write(value&0xff);
    if( Wire.endTransmission() == 0 )
    {
      return true;
    }
  }
  return false;
}
With these we can implement the master-side servo functions:
//----------------------------------------
// Servo Control
//----------------------------------------

void setServoMaxVelocity( int vel )
{
  trktRegWrite2( TRKT_SERVO_VELOCITY, vel);
}

void setServoPWM( int minWidth, int max width )
{
  trktRegWrite2( TRKT_SERVO_PWM_MIN, minWidth);
  trktRegWrite2( TRKT_SERVO_PWM_MIN, maxWidth);
}

void setServoTargetAngle( ubyte angle )
{
  trktRegWrite( TRKT_SERVO_NEW_MODE, TRKT_SERVO_FIXED);
  trktRegWrite( TRKT_SERVO_NEW_ANGLE, angle );
}

void setServoSweep( ubyte min, ubyte max )
{
  trktRegWrite( TRKT_SERVO_NEW_MODE, TRKT_SERVO_SWEEP);
  trktRegWrite( TRKT_SERVO_SWEEP_MIN, min);
  trktRegWrite( TRKT_SERVO_SWEEP_MAX, max);
}

int getServoAngle()
{
  ubyte angle;

  if (trktRegRead( TRKT_SERVO_ANGLE, (char*)&angle))
  {
    return (int) angle;
  }

  return -1;
}
Note that changes to the servo registers only take effect once the TRKT_SERVO_UPDATE register has been written to with a non zero value.
void updateServo( )
{
  trktRegWrite( TRKT_SERVO_UPDATE, 1);
}
And reading the distance sensor is a simple register read:
// returns inches
int readDistance()
{
  ubyte dist;

  if( trktRegRead( TRKT_SONIC_DISTANCE, (char*)&dist))
  {
    return (int)dist;
  }

  return -1;
}
Done.
Coding Up The Trinket
On the Trinket side things ended up being a little more spartan than I had imagined and a lot more work too. There are only 5310 bytes of Flash RAM available for sketches. I had to forgo using my Servorator library as it was too fat for the Trinket. There were a few other issues too…
I2C Slave
Thankfully, with TinyWireS on GitHub, setting up the Trinket as an I2C slave was a breeze
#include <TinyWireS.h>

//----------------------------------------
//
//----------------------------------------

#define GET_REG(A)    i2c_regs[A]
#define GET_REG2(A)   (((uint16_t)(i2c_regs[A])<<8)| \
                        (uint16_t)(i2c_regs[(A)+1]))
#define SET_REG(A,V)  i2c_regs[A] = (uint8_t)(V);
#define SET_REG2(A,V) {i2c_regs[A] = (uint8_t)(((V)>>8)&0xff); \
                       i2c_regs[(A)+1] = (uint8_t)((V)&0xff);}

#ifndef TWI_RX_BUFFER_SIZE
#define TWI_RX_BUFFER_SIZE ( 16 )
#endif

volatile uint8_t i2c_regs[TRKT_NUM_REGISTERS];

// Tracks the current register pointer position
volatile byte reg_position;
const byte reg_size = sizeof(i2c_regs);
const byte reg_size_lessone = reg_size-1;


//----------------------------------------
//  Setup
//----------------------------------------

void setup()
{
  :
  // inititalize registers/system
  SET_REG(TRKT_STATUS, TRKT_STATUS_INITIALIZING);
  SET_REG(TRKT_SERVO_MODE, TRKT_SERVO_FIXED );
  SET_REG(TRKT_SERVO_ANGLE, 45 );
  SET_REG(TRKT_SERVO_NEW_MODE, TRKT_SERVO_FIXED );
  SET_REG(TRKT_SERVO_NEW_ANGLE, 45 );
  SET_REG2(TRKT_SERVO_PWM_MIN_HI, 500 );
  SET_REG2(TRKT_SERVO_PWM_MAX_HI, 2500 );
  // Velocity is in 10th's of degrees per second
  SET_REG2(TRKT_SERVO_VELOCITY_HI, 100*10 );
  SET_REG(TRKT_SERVO_SWEEP_MIN, 45 );
  SET_REG(TRKT_SERVO_SWEEP_MAX, 135 );
  SET_REG(TRKT_SERVO_UPDATE, 1 );
  :
  :
  // Start I2C handling
  TinyWireS.begin(TRINKET_ADDRESS);
  TinyWireS.onReceive(receiveEvent);
  TinyWireS.onRequest(requestEvent);
  :
  // let master know we are ready
  SET_REG(TRKT_STATUS, TRKT_STATUS_READY);
}

//----------------------------------------
// Loop
//----------------------------------------

void loop()
{
    TinyWireS_stop_check();
    update_servo();
    update_sonic();
}

//----------------------------------------
// I2C Handling Logic
//----------------------------------------

:
void requestEvent()
{
    TinyWireS.send(i2c_regs[reg_position]);
    // Increment the reg position on each
    //read, and loop back to zero
    reg_position++;
    if (reg_position >= reg_size_lessone)
    {
        reg_position = 0;
    }
}

:
void receiveEvent(uint8_t howMany)
{
    if (howMany < 1)
    {
        // Sanity-check
        return;
    }
    if (howMany > TWI_RX_BUFFER_SIZE)
    {
        // Also insane number
        return;
    }

    reg_position = TinyWireS.receive();
    howMany--;
    if (!howMany)
    {
        // This write was only to set the buffer
        // for next read
        return;
    }
    while(howMany--)
    {
        i2c_regs[reg_position] = TinyWireS.receive();
        reg_position++;
        if (reg_position >= reg_size_lessone)
        {
            reg_position = 0;
        }
    }
}
The one gotcha with I2C on the ATTiny85 microcontroller is that the processor is missing a hardware interrupt for “end-of-transmission” events. This means that a TinyWireS_stop_check() function must be called continually to manually poll for those events. This makes I2C on the Trinket not so robust as it should be.
This means no blocking calls can be used. A good example is the sensor handling code. In the original code form the Arduino:
//----------------------------------------
// Sensor
//----------------------------------------

// returns 100ths of inches
int readDistance()
{
  // reset trig pin
  digitalWrite(trigPin, LOW);
  delayMicroseconds(2);
  // pulse trig pin
  digitalWrite(trigPin, HIGH);
  delayMicroseconds(10);
  digitalWrite(trigPin, LOW);
  // read duration till echo
  long duration = pulseIn(echoPin, HIGH, 60000);
  return duration ? (int)((duration*50L)/74L) : 10000;
}
It is using the blocking function pulseIn(). This will break I2C handling as TinyWireS_stop_check() needs to be call very frequently, every millisecond or more. I had to rewrite the function to make it state based instead:
//----------------------------------------
// Sensor Logic
//----------------------------------------

void update_sonic()
{
  static bool  sonicWaiting = false;
  static long triggerStart = 0;
  static bool sonicHigh;

  long now = micros();
  long duration = now - triggerStart;

  if( sonicWaiting )
  {
    if (!sonicHigh && digitalRead( echoPin) == HIGH)
    {
      triggerStart = now;
      sonicHigh = true;
      return;
    }

    if( !sonicHigh || digitalRead( echoPin) != LOW)
    {
      if (duration < 6000L)
      {
        return;
      }
    }

    uint8_t inches = ((duration*50L)/7400L);
    SET_REG(TRKT_SONIC_DISTANCE, inches );
    sonicWaiting = false;
    triggerStart = now;
  }

  if( duration > 50000L )
  {
     // reset trig pin
    digitalWrite(trigPin, LOW);
    delayMicros(2);
    // pulse trig pin
    digitalWrite(trigPin, HIGH);
    delayMicros(10);
    digitalWrite(trigPin, LOW);
    sonicWaiting = true;
    sonicHigh = false;
    triggerStart = micros();
  }
}
Not the most elegant code but it works.
Controlling The Servo
The final part was to get the servo to work on the Trinket. Even though pin 1 has hardware for generating PWM I don’t think it is possible to get it down to the 50 Hz range needed for servos.
Initially I simply emulated the signal within the super-loop with another state-based function:
 :
  {
    static bool servoHi = false;
    static long servoNext = 0;
    static long servoLast = 0;

    // update PWM signal
    long now = micros();
    servoNext -= (now - servoLast);
    if ( servoNext < 0 )
    {
        digitalWrite( servoPin, servoHi ? LOW : HIGH);
        servoNext = servoHi ? 20000L - servoWidth : servoWidth;
        servoHi = !servoHi;
    }

    servoLast = now;
  }
 :
But it makes for a jittery servo as the super-loop timings will vary. Though at this point I’m fine with that. The whole build has turned into way more work than expected and having slight jitters for a sweeping sensor is not the end of the world.
Still, I was curious if I could do better using a timer interrupt. I looked around to see if anyone had done this before and found a lib called Servo8Bit (https://github.com/fri000/Servo8Bit). Unfortunately it wouldn’t work as-is in the Arduino IDE. I had to make modifications and fix one compiler bug to get it to work. I also modified it to support 16MHz clocks and made a repo of the changes on GitHub (https://github.com/solderspot/Servo8Bit).
With the servo now serviced via interrupts it was nearly jittery free. Perfect.
Finally
The servo and sensor are, at last, operating problem free on the Trinket. The encoders and motors are working on the Arduino. After a little more clean up and tweaking, WallBot V4 is finally complete and running:
One other change I had to make was with regard to the I2C communications. Because the Trinket must poll for “end-of-transmission” states, it was having problems handling rapid transmissions from the Arduino. The solution was to space out the transmissions by preceding them with a call to the following function which blocks if 5 milliseconds have not passed since it was last called:
// delay if last time called was less than 5 ms
void trktDelay()
{
  static unsigned long last = 0;

  long diff = 5 - (millis() - last);

  if( diff > 0 )
    delay(diff);

  last = millis();
}
And that is that. You can view the complete code for both the Trinket and Arduino here: https://github.com/solderspot/WallieBot/tree/master/WallBot_v4
One task remaining is to get the PID controller configured for the new encoders and motors. I’ve already noticed that the bot drifts to the left when going forward.
And on a side note: The big take away for me on this build was that the Arduino Uno may not be the platform I should to be using for robotics. It’s simple to use and program for sure but I’m already maxing out what it can do and I’ve only really just got started.
Not sure what platform to move to. It will take some research. I really like the specs of the BeagleBone Black and Raspberry Pi but not sure I want to have a Unix kernel for realtime programming…. I’m sure there are lots of other platforms and options to choose from. It’ll take some digging.
Still got a few things planned for Zumo. Next up is to add bluetooth….

